Lab 5: Loopy Lab
The goal of this lab is to practice using nested for loops. We will create
a program that makes the following image:
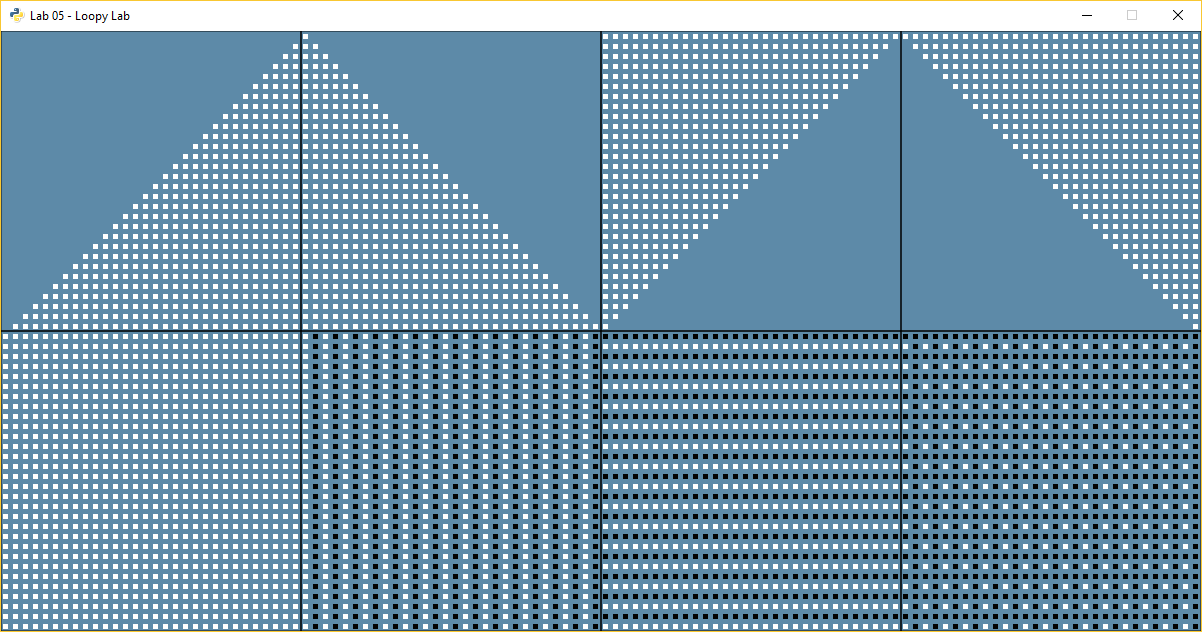
For sanity’s sake, let’s give a number to each section. Then when we ask questions we can say which section we are talking about. Do not put the numbers in the final program. Here are the section numbers:

Great! All these items can be created using nested for loops.
Getting Started
Below is some code to get you started. Underneath each of the comments, fill in the code required to make the pattern.
import arcade

# Create a window
arcade.open_window("Lab 05 - Loopy Lab", 1200, 600)

arcade.set_background_color(arcade.color.AIR_FORCE_BLUE)

arcade.start_render()

# Draw squares on bottom
arcade.draw_rectangle_outline(150, 150, 300, 300, arcade.color.BLACK)
arcade.draw_rectangle_outline(450, 150, 300, 300, arcade.color.BLACK)
arcade.draw_rectangle_outline(750, 150, 300, 300, arcade.color.BLACK)
arcade.draw_rectangle_outline(1050, 150, 300, 300, arcade.color.BLACK)

# Draw squares on top
arcade.draw_rectangle_outline(150, 450, 300, 300, arcade.color.BLACK)
arcade.draw_rectangle_outline(450, 450, 300, 300, arcade.color.BLACK)
arcade.draw_rectangle_outline(750, 450, 300, 300, arcade.color.BLACK)
arcade.draw_rectangle_outline(1050, 450, 300, 300, arcade.color.BLACK)

# Section 1
for row in range(30):
    for column in range(30):
        x = 0  # Instead of zero, calculate the proper x location using column
        y = 0  # Instead of zero, calculate the proper y location using row
        arcade.draw_rectangle_filled(x, y, 5, 5, arcade.color.WHITE)

# Section 2
# Use the modulus operator and an if statement to select the color
# Don't loop from 30 to 60 to shift everything over, just add 300 to x.

# Section 3
# Use the modulus operator and an if statement to select the color

# Section 4
# Use the modulus operator and an if statement to select the color

# Section 5

# Section 6

# Section 7

# Section 8

arcade.finish_render()

arcade.run()
Scoring
There are 20 possible points:
- Section 1: 2 pts
- Section 2: 2 pts
- Section 3: 2 pts
- Section 4: 2 pts
- Completing any section 1-4: 1 pt
- Section 5: 2 pts
- Section 6: 2 pts
- Section 7: 2 pts
- Section 8: 2 pts
- Completing any section 5-8: 1 pt
- Code Style: 2 pts (Should have no yellow lines on right side of PyCharm)
Hints
Each little square is a 5x5 pixel square.
If the center of each square is 5 apart, you won’t see an edge and it will look like one big square.
Remember, row controls up and down, so it corresponds to y. Column corresponds to x.
When working on sections 2-8, you can simple add to the x and/or y values to shift everything over. For example, just add 300 to all the x values in section 2, to put it in the second box.
Each section is 300x300 pixels.
Remember that the
%sign is the modulus. It calculates the remainder. So:0 % 3 = 0 1 % 3 = 1 2 % 3 = 2 3 % 3 = 0 4 % 3 = 1 5 % 3 = 2 6 % 3 = 0
You can count “backwards” by subtracting.
print("Count up!")
for i in range(10):
    print(i)

print()
print("Count down, even if i is going up")
for i in range(10):
    x = 9 - i
    print("i is", i, "and 9-i is", x)
This prints:
Count up!
0
1
2
3
4
5
6
7
8
9

Count down, even if i is going up
i is 0 and 9-i is 9
i is 1 and 9-i is 8
i is 2 and 9-i is 7
i is 3 and 9-i is 6
i is 4 and 9-i is 5
i is 5 and 9-i is 4
i is 6 and 9-i is 3
i is 7 and 9-i is 2
i is 8 and 9-i is 1
i is 9 and 9-i is 0